Thank you…
for choosing Pontem® Software and our Property Tax Software Suite.
As more offices go paperless, there’s been increasing interest in providing a way to store electronic copies of important documents and images directly within our software products.
We’re proud to announce the addition of an Image and Document Management feature to our Pontem Tax Administration, Delinquent Taxes and Tax Receipting modules allowing you to associate an unlimited number of images or documents with a parcel for quick reference. Items can be attached by browsing and/or scanning while entering a new record or when editing a record later.
This document will explain the features available and how to utilize this new upgrade to your Pontem Software.
Edit | Adjust Preferences | Images
To configure the system for the Image/Document management feature contained in Pontem’s Tax Administration (TA), Delinquent Taxes (DT) and Tax Receipting (TR) modules, navigate to the Adjust Preferences window and click on the ‘Images’ folder.
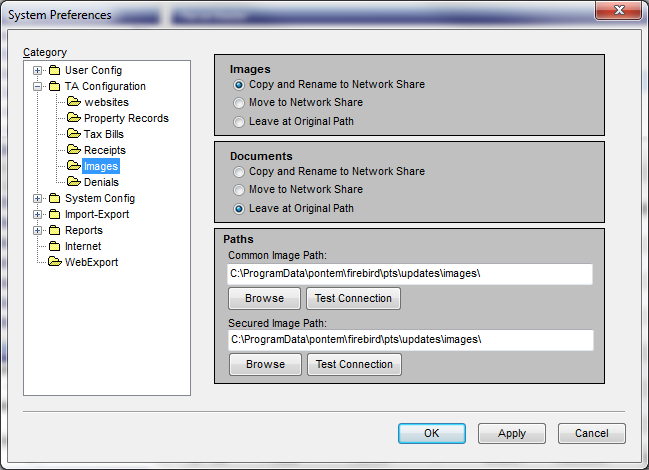
‘Images’ and ‘Document’ File Storage Options
Copy and Rename to Network Share
This option copies selected documents or images from a local drive (i.e., SpecialAssessment.pdf) and saves them in the designated location. The software will rename the file with the next document number available in the folder.
Move to Network Share
This option moves the selected file from the original location and copies it to the designated location without changing/renaming the original file name.
Leave at Original Path
This option leaves the file where it was originally located.
Paths
Common Image Path
Click the Browse button to select the default location on the computer/network to store images and documents associated with the Property Tax System.
*If you have multiple databases, log into each database to configure the correct path for a separate image folder for each database.
Secured Image Path
Click the Browse button to select the location on the computer/network to store images and documents associated with the Property Tax System. These images are secured by the permissions granted to the Pontem user’s assigned group. Check with your tech support department to take steps to secure the storage folder.
Test Connection
Click the Test Connection button to validate a legitimate path. If the path is correct a “Connection Successful” message will appear. An error message will appear if the folder listed in the image paths is not accessible. Use the Browse button to select a new location to save the files.
Images/Documents View
The Images/Documents view can be found in ‘Manage Property Records’ in Pontem’s Tax Administration module, and in ‘View Parcels’ in both Pontem’s Delinquent Taxes and Tax Receipting software
While the examples give below are related to images, any sort of file can be attached to the Parcel record including spreadsheets, word processing documents and PDF’s.
Attaching Files
Files can be added when new records are added or later in Edit Mode.
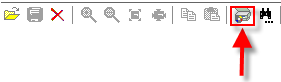
On the View tab, click the Images/Documents link to display the ‘Images’ workspace. Click the Edit button, if not adding a new record, to add a file or image.
On the Images toolbar, click on Open from file icon

A Windows “Open” file window will launch. Select a file you wish to associate with this record and click Open.
The file will now appear in the Title & Caption grid on the Images/Documents View. Attached .jpg images will be visible at the bottom of the screen.
Enter a description for the image in the ‘Caption’ column (i.e., Residence from Curb View, Garage Side View, Storm Damage 2007, etc.).
Select the Secure checkbox to limit ability to view the file based on Pontem permissions.
If you have additional images or files to associate with the record, repeat until you have all files in the program, then click the Save button.
Attaching Images from a Scanner
On the View tab, click the Images/Documents link to display the Images workspace.
On the Images toolbar, click on ‘Acquire Image from Scanner’ icon.
Scanner Options will appear where you can select the correct scanner, and either choose to show the scanning software interface, or the Pontem scanning dialog to walk you through the scanning process.
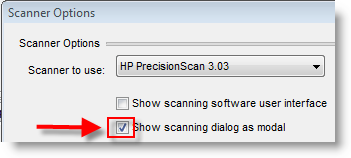
NOTE: We recommend selecting “Show scanning dialog as “modal”.
The scanner will now step through the scanning process, and screens will vary depending on your scanner and which option you select.
Once the image is finished scanning, a portion of the image will now be visible at the bottom of the screen, and the list will include the image title. If you want to enter a caption for this image you may do so at this time. Repeat until you have all images in the program, then click the Save button.
0 Comments