Quick Links to Each of the Steps:
STEP 1 - PREPARE FOR YOUR NEW TAX YEAR
- GET THE HOMESTEAD EXEMPTION ALLOWANCE
- PUT YOUR PVA FILES IN A SUB FOLDER OF YOUR IMPORT DIRECTORY
- If required, MAKE CORRECTIONS to the PVA files
- BACK UP YOUR DATABASE
STEP 2 - INITIALIZE YOUR NEW TAX YEAR - (Alt-F, A, A)
- ADD HOMESTEAD EXEMPTION ALLOWANCE
-
IMPORT REAL PROPERTY VALUES
- Verify Totals
-
IMPORT TANGIBLE PROPERTY VALUES
- Verify Totals
-
INITIALIZE YOUR TAX PERIOD DEFINITIONS
- Clone the Tax Period from last year
STEP 3: Use MANAGE PROPERTY RECORDS to Make Corrections to Property Records
STEP 4 - Use TAX ROLL SETUP TO COMPLETE TAX DEFINITIONS AND BILL SETUP
- Tax Unit General View
- Correct Addressing
- Correct P & I
- Correct Messages that print on Tax Bills
- Tax Levy Definitions View to Update Levy Table
- Add Levy Items that are New for this tax year
- Remove Levy Items that are not valid for this tax year
- Set the Discount and P&I Check Boxes on each levy item
STEP 5 - CREATE YOUR TAX BILLS
- VERIFY ASSESSMENT ROLL TOTALS
- Run the Create Tax Bills tool in Tax Roll Setup
STEP 6 - Use PREPARE TAX BILLS WORKSPACE to EDIT YOUR TAX BILLS
- Add Special Taxes like Mowing and Attorney Fees
- Make exemption and other last minute changes pre-collection to tax bills
- Verify you Tax Bill Totals First
- Test Print to check varying tax bill types, special tax, fees, etc
STEP 8 - ACTIVATE TAX ROLL for COLLECTIONS
STEP 9 - UPDATE YOUR ONLINE PROPERTY TAX SEARCH DATA
STEP 1 - PREPARE FOR YOU NEW TAX YEAR
First 1A Find out your Exemption Allowance for this tax year and make A note of it for entering later.
Next 1B Place the files you received from the PVA into your import folder.
It's best to download them to the same location/folder you did last year. You can find this location set in your application preferences here:
After opening this location to confirm it still exists, download your PVA files from the email:
- In a new sub folder named for the current year (Example C:\Pontem\Import\2025)
- RENAME the REAL and TANG data files so they are easy to identify at the TOP of the folder file list (ie: 2023_REAL_MyCity)
-
Print your PVA Assessment Roll Totals received from PVA
- We recommend you PRINT a copy of the PVA Assessment Roll totals provided. You will use this later when you Verify Totals when importing the data.
- Alternatively, you can just be prepared to open the file to compare it side-by-side with the Pontem report.
Next: 1C. IF Required: Prepare \ Format Your PVA Files to the Format Required for you custom Import
If you received files from a PVA in Oldham county:
You will need to Edit the files in Excel to correct the format before you can continue. This is because in some Kentucky counties, the PVA does not provide the file in a format that was originally provided when your Custom County PVA Import was developed and thus you need to perform changes or pre formatting of the file before you can proceed.
If you do not have notes regarding this and are unsure if you need pre formatting, you can click here to create a support request to get assistance from a Pontem TA application specialist.
Lastly 1D Create a Backup of your Database
You should always create a backup of your data before you import any changes. This will allow you to revert back to the original data state as of this moment if needed.
From the menu select File, Maintenance, Backup your Pontem Tax Administration Data.
On the Backup dialog, you may want to note where this backup folder is located on your PC, leave the default settings and select the OK button.
Once the backup is complete, you can close the tool and continue.
STEP 2 - SET UP YOUR NEW TAX YEAR
To set up your Tax Year, you will need to complete these steps, specifically in this order:
- Add Your Exemption Allowance
- Import PVA REAL Records
- Import PVA Tangible
- Create/Clone your Tax Year
An Update to your Pontem Tax Administration is available as of August 1 2025. If you are in Campbell County, it is important to install this upgrade before you continue. If you do not have this update you can CLICK HERE to have instructions emailed to you.
If you have installed the August 2025 Update, you will find a new feature has been added to your Pontem Tax Administration to simplify this set up process. This feature will allow you to do the set up from one simple user dialog instead of having to navigate to three different areas in the application.
Menu: File| Administration| Manage Assessment Years (Shortcut= ALT-F, A, A)
Note: If your dialog does not look like the one below, you do not have the Update for 2025 and you can CLICK HERE to have the update instructions emailed to you.
2-1 Add the Exemption Allowance
Select the "Manage Exemption Allowance" button from the Manage Assessment Years tool
(or if you have the older TA version select Menu: Edit | Adjust System Preferences | System Config | Value Exemptions)
- Select the "New" button to insert a new line in the grid
- Fill out the form to the right of the grid
- Select the SAVE button to save the record into the grid
2-2 Import your REAL Property Values from your PVA files
Select the "Import Property Values" button from the Manage Assessment Years tool
(or select Menu: File | Import | Load Parcel Values)
You will first be prompted to BACK UP your data. We recommend you select YES unless you have already answered YES in a recently canceled run of this import
Parcel Values Import Setup Page 1
Import Real Property values (IRV) first. Importing the Tangible Property values will be done later; these use a different ‘Import Type’ and procedure.
At the Set-up screen, select the needed settings for
‘Import Type’, the ‘Taxing Unit’, ‘File Location‘ and ‘Files to Process‘.
Click the ‘Next’ button to continue through the import steps.
Parcel Values Import Setup Page 2
Fill in the screen as seen below; basically its setting the Radio buttons and CHECK ALL Boxes .
This defaults to (Re) Initialize Assessment Roll for the first (REAL values) import.
Click on ‘Files’ button to continue.
Parcel Values Import Setup Page 3 - Confirm File Date
The program will look for the files and check the date of the files. If the date is older than 30 days, you will receive a warning so your attention is draw to the date of the files you selected. The is to allow you the opportunity to be certain you have not accidentally selected an old/outdated file.
If the file name and date looks correct Click ‘Validate.’
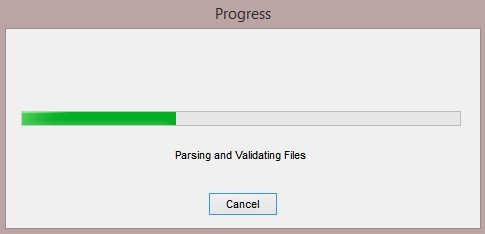
Next, you will see the following progress window which indicates the data is being parsed and validated:
Reviewing Warnings and Errors
When the import is complete the ‘Warnings, Critical Warnings, or Errors’ list is displayed.
If Critical Errors need to be corrected in the PVA file, the 'Process" button will be disabled and you will not be able to continue; you will need to correct the PVA file and rerun this import from the beginning.
Errors can often be resolved by reaching out the the PVA to ask for files in the same format provided the previous year. If you prefer or the PVA is not able to assist, you can click here to create a support request to get assistance from a Pontem TA application specialist.

If there are no Critical Errors (none or only Warnings) click on the ‘Process’ button to continue to the the 'Import Values' display.
PRINT REPORT AND VERIFY REAL VALUE Import matches PVA TOTALS
When the Process step is complete, the ‘Import Values’ dialog will display.
Select the 'Reports' button AND from the drop down a menu Select 'Districts Stats' report.
When the report filter form displays
- Select the 'Ok' to accept the default filtering options
- When the report displays
- Select the Printer Icon in the upper left of the report preview to print the report
- After printing, Close the report preview window
- Now Compare the printed Districts Stats Totals to your PVA Totals Report
You should not continue if cannot justify any differences in the reports.
Note that selecting the CLOSE button will SAVE what you have processed to this point. Once you have verified your totals, you can return to the Import again and it will show your unfinished/unprocessed import in a grid in the right side of the dialog, with buttons in the lower right to Continue Processing or Remove Import.
After you have confirmed your totals are correct you can continue to complete the importing of the records.
Selecting ‘Apply All in List’ to continue importing
Once you click ‘Apply All In List’ the following window will appear confirming this action.
Click ‘Continue’.
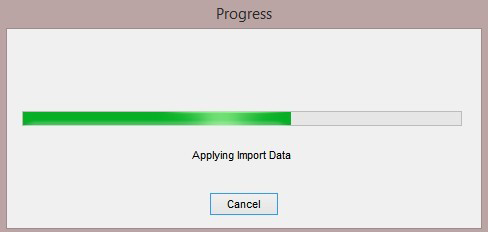
The following progress window will indicate the data is being imported:
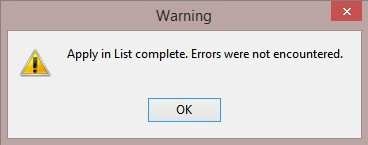
The following will display when it has finished
click ‘OK’ to continue with processing Owner Address History changes
Selecting Owner History to Record.
At this point, if any OWNER CHANGES are being made in your assessment roll, you will see a list with an option to select which ones should be recorded in history tracking.
Click on "Select All" option to place a check mark in front of all records
Select the "Record Ownership History" button to continue.
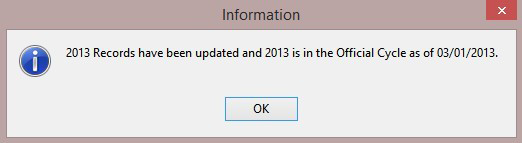
When the Import successfully completed you will receive this confirmation.
Click OK to close the import program:
IMPORTANT: At this point you should CLOSE the TA program
before continuing with your TANG import.
2-3 Import Tangible Property Values (ITV)
NOTE about Prior Year Tangibles:
Tangible parcels from the previous year are not included in the current or “new year’s” import file. Therefore, tangibles imported in the previous year are “retired by omission.”
The existing prior year tangible records will receive a value record for the current year with no value totals, and a property class of “ZT” (‘Retired Tangible’) is assigned.
Select the "Import Property Values" button from the Manage Assessment Years tool
(or select Menu: File | Import | Load Parcel Values)
In Pontem TA, Navigate to : File | Import | Load Parcel Values.
You will first be prompted to BACK UP your data. We recommend you select YES. If you get an error after selecting YES, do not continue! Close your TA Program and log-in and re-launch the tool.
At the set-up screen below select the appropriate ‘Import Type’, the ‘Taxing Unit’, and the file path to the file to import. Click ‘Next’ to continue.
Make sure the ‘Import Type' is for your county TANGIBLES
When importing the Tangibles do not select ‘(Re)Initialize Assessment Roll’ – select ‘Update Certified Values’. Failure to select ‘Update Certified Values’ will cause the removal of current year values already imported for the real property. Tangibles are added as new parcel records each year, select to import ‘New Parcels‘ only.

As this is the second time you are importing data for the new tax year you will see the following warning window. Click ‘Yes’ to continue.

The display on the next screen shows which file/s will be used to pull the names, legal descriptions, and values for the new assessment year. Click ‘Validate’. The program will look for the files and check the date of the files.

The following progress window will indicate the data is being imported:
The next window shown below displays the list of tangible parcels found in the import file. Click ‘Process’ to continue.

At the results screen shown below, click ‘Apply All in List‘ as these records are all new to the database so there is no need to review them. Note, unlink the REAL import, you will print totals for TANG after you complete this step.
Click on the Continue button to import the Tangible parcels.

When the import has finished you will see the following warning dialog. Click ‘OK’.
The ‘Information’ dialog indicates the import process is complete and official:
Now you can Print a Parcel Values Report for all your properties.
Menu: Reports|Parcels|Parcels|Parcel Values Reports|Parcel Values Summary Report
Leave all the defaults and select OK.
A preview of both the REAL and TANG totals will display.
You can print this report or verify the totals from the preview.
2-3 Create/Clone the Tax Year/Period
Clone Tax Period
Select the "Create/Clone a Tax Period" button from the Manage Assessment Years tool
(or Navigate to Tax Roll Setup | Tools Tab | Create/Clone Tax Period)
Using this feature saves you from rebuilding the tax levy list and tax calculation control setup you entered last year.
- Set to Winter
- Select previous year for Clone year
- Select the Clone/Create button
When the clone is completed it will be noted on the dialog, when you navigate to Tax Roll Setup you should see your new tax period added in the list.
After closing the Manage Assessment Years tool, You can navigate to Tax Roll Set and may need to change Quick Search Tax Period to see your new tax period the list.
At this point, you can continue to Manage Parcel Records needed prior to creating the tax bills.
You will update these later - after the levies have be approved.
STEP THREE: Make Needed Parcel Record Changes
Before you create your official tax roll and bills you must update values used for calculations first.
- Update Discount Rates
- Update Waste and Other Special Assessment Districts
- Add Missing Property Records
- Correct/Update Taxpayer Names and Addresses
- Correct Property Values and Exemption Status
Update Discounts Allowed for New Year
‘Discounts’ are found in Edit| Adjust System Preferences| System Config. If nothing has changed from the existing settings, skip this step.
Once you approve the imported values you will also want to perform any maintenance on your individual parcel records which will affect the calculation of tax bill.
Correct Property Values and Exemption Status if Needed
Often clients tell us they are instructed by the PVA to correct an exemption or assessed value made by their county. These corrections should be completed before calculating the tax bills. Parcel Values are added/removed from the parcel record in Manage Property Records | Values View, Edit Values Button.
If a parcel from last year was not included in the PVA import file there will be no values for the current year and parcel has been reclassified as “retired” in your database; no tax bill will be created for the current year, though it is still possible to print delinquent bills for retired parcels. You may know the parcel is still active and know it should have value against it. If so, simply select the Edit Value button and change the Property Class and Values as needed. Tangibles are a prime example of this scenario.
Update Parcel District Codes
Once you approve the imported values you will want to add or remove district codes for parcels with special tax items such as “Waste,” etc.
Parcel District Codes are added/removed from the parcel record in Manage Property Records | Values View, Edit Values Button.
STEP Four: COMPLETE TAX DEFINITIONS AND BILL SETUP
Before you Create your tax bills, you need to have all your Tax Rates, Fees, and Discount Flags defined.
Navigate to Tax Roll Set Up and use your mouse to SELECT new tax period in the list.
Select the Tax Unit General Info View to make corrections to Addresses Interest and Penalty Rates and printed Tax Bill Messages
1. Tax Roll Setup - View Tab - Tax Unit General Info, General Tab (see yellow highlight)
On this view, make corrections needed to information that is printed on the tax bills:
- Treasurers Name and Address
- Penalty and Interest settings (red arrows below)
- At this time, leave the Tax Roll Date blank
Now change the Tab (see yellow highlight in the above sample) to update information for Notices, Messages, Headings
2. Tax Roll Setup - View Tab - Tax Levy Definitions, Levy Tab
Make Corrections Levies for Tax Bill Calculations
Note: If you don't yet have your approved tax rates, you can return to this step at a later date, but you will need to complete this before you calculate your tax bills.
Start from the "Levey List" tab and review each TAX DESCRIPTION, RATE, and Penalty, Interest, and Discount Flags. Note which ones need to be added, removed, and/or changed.
IMPORT NOTE IF YOU HAVE DISCOUNTS:
As a safeguard, the Discount Check Box is NOT cloned from the prior tax year.
Review the Discount Check Box for ALL Levy definitions and make sure the box is Checked/Unchecked appropriately.
Using the Buttons to make your corrections:
- Use the New and Delete buttons to Add or Remove a levy.
- Use the Edit button to change the Tax Description, Rates, Interest, Penalty and Discount flags or other restricts from your cloned tax period to what is required for your current tax period
Adding Definitions for New Special Tax Items
At this time, you should define your new Special Tax items that are to be added only to specific tax bills, such as Code Enforcement.
In Tax Roll Setup | Tax Levy Definitions select the New button.
The General Tab will be displayed in EDIT mode. Set the Calculation Method and Authority as indicated in the picture below. You will use these definitions to add the specific tax amount AFTER the tax bills are created. This is explained later in this document.
After you complete the General information, you need to move to the RESTRICTIONS tab to define which tax bills will need this special tax. For instance, you may have assigned a District Code to parcels that are to receive a BKDEP fee.
After your restrictions are defined be sure to select the SAVE button and review the item in on the Levy List tab.
STEP Five: Create the Tax Roll and Bills
Once you have printing options defined and all your rates, fees, and allowances defined you can continue with creating your tax bills.
Verifying Levy Definitions for the Tax Year
You can open do a final review of these in Tax Roll Setup, Tax Levy Definitions View or you can print a report from the Reports Menu, System Table Reports, Tax Levy Definitions Report.
Verifying Parcel Value Totals before you Create Bills
Before you create your official tax roll and tax bills, you should verify your assessment roll totals to make are the still the same and reported by the PVA and/or adjusted as expected.
You can verify your assessment roll totals for both Real and Tangible by going to
Reports | Parcel | Parcel Values | Parcel Values Summary Report
Compare it to the report you received from the county PVA - adjusting for any changes in Exemptions and Value that you may have made manually after the import.
Review the column labeled ‘Taxable $’ for exemption totals.
Also in the Reports| Parcel Reports menu, you will find ‘Parcel Exemption by Class’ and ‘Parcel Exemption by PIDN’. These two items will aid you in tracking down information about the records which cause you concern. Make sure you compare the parcel count for each exemption to the county report as well.
If you discover a problem when you compared the reports, we can work with you to determine what course of action should be taken. Call or email the Pontem Help Desk at 888.237.8531 or support@pontem.com.
Create the Tax Bills (CTB)
CTB1. Select Prepare Tax Bills or Tax Roll Set and then the Tools Tab | Create\Update Tax Bills tool.
CTB2. Correct the Setup Dialog if it did not initialize correctly:
- Set the ‘Tax Period’ field
- Set the ‘Taxing Unit or Village’ field
- Select the ‘Next’ button

CTB3. On the next screen,
- select the ’Roll Type’ of ‘AD Valorum’.
- Select ‘Current \Final Value for Tax Year’
- Select ‘Finish’.

Next, you will see the following window which will inform you of the progress while tax bills are updated:
CTB4. Once your tax bills have been updated a summary of the tax bill totals is displayed. Print this Summary by clicking the ‘Print’ button. Then click ‘Commit Changes’ to complete the calculation process.

STEP SIX: EDIT YOUR TAX BILLS AS NEEDED
Special Taxes/Assessments
After your bills are created, you can add the special taxes/assessment that were not set up to be calculated, to specific tax bills. There are two ways you can add these.
1. Add by Editing the Tax Bill
In the Prepare Tax Bills Primary Task/Workspace, You can use the EDIT a tax bill and navigate to the DETAIL page to add a special tax to a bill, or you can use the
2. Add to Multiple Bills Using the Add/Edit Special Levies
This function is on the Tools Tab in the Prepare Tax Bills Primary, Tool tab, Add/Edit Special Levies link.
Start with the panel in the upper left panel by selecting the Special Levy Tax Description and then select the Search button. This will refresh the list on the upper right to display all the bills that already have this Special tax item added.
You can add this special tax to another bill from the panel below the list of bills.
- Enter the Parcel Number
- Enter the Amount
- Select the Apply button.
If you do not know the parcel number, use the Search tool in the bottom panels to local and select.

STEP SEVEN: Printing
Verify Your Totals Before Printing !!
Before printing your bills, verify your tax bill totals have calculated as expected by printing an ‘Original Tax Roll Balancing’ and ‘Tax Bill Statistics Report’.
To do so, click on Tax Rolls and Bills | Original Tax Roll Balancing Report on the ‘Reports’ menu. Make sure the ‘Tax Period’ field is set to the current tax period and click the ‘OK ‘button at the bottom of the screen.
To run a 'Tax Bill Statistics Report' go to Tax Rolls and Bills | Tax Bill Statistics Report on the 'Reports' menu. Make sure the ‘Tax Period’ field is set to the current tax period and click ‘OK’ at the bottom of the screen.
Print a Test Batch
Once you've verified your totals, print a few test bills to check alignment, addresses, messages, levy descriptions, etc. for any items that may not print correctly. If you use a barcode reader, scan the barcode to make sure it reads correctly.
To print tax bills select Reports | Tax Rolls and Bills | Tax Bills and Notices | Current Tax Bill Original/Reprint (or if using a custom tax bill select your tax bill definition from Reports | Custom | Tax Rolls and Bills | Tax Bills and Notices).
To print selected bills, (e.g., just a few to check alignment), fill out the appropriate filters and click the OK button. Once you’re satisfied with the results, proceed with printing all bills. To print all bills, just click the OK button on the Report Filter screen.
Sending Bills to a Third-Party Print Service
If your jurisdiction uses a third-party service to print, fold, and/or mail your tax bills, select Reports | Tax Rolls and Bills | Tax Bills and Notices | Tax Bill Export File – Print Service. This will create a comma separated value (CSV) file that can be sent to your printing/mailing service.
Another option for sending an electronic file to a print service is to print the tax bills using your unit’s custom tax bill, and at the print preview save the tax bills in a .pdf (Portable Document For-mat) file using the ‘Print to File’ option.
To print selected bills, (e.g., just a few to check alignment), fill out the appropriate filters and click the ‘OK’ button. Once you’re satisfied with the results, proceed with printing all bills. To print all bills, just click the ‘OK’ button on the ‘Report Filter’ screen.
STEP EIGHT: Activate or Freeze for Collections
Until now, your ‘Tax Roll Date’ has been left blank to indicate you are in the ‘Prepare Tax Bills’ cycle.
Adding a Tax Roll Date indicates to the system the tax roll is moving out of the Preparation cycle and into the Tax Bill Collections cycle and:
- You have finished creating and preparing ALL your tax bills in the Prepare Tax Bills (PTB) Primary Task workspace - both Real and Tangible/Personal tax bills.
- Your tax roll totals are approved and ALL your tax bills are printed or ready to be printed.
- You no longer need to use the batch tools for Create/Update in the PTB workspace.
- You are certain you will need only simple Edits and Corrections or Additions to individual tax bills.
- On this date and forward All Edits, Additions and Payments, will now have an audit trail with an audit receipt created and accessible in Tax Bill Receipts workspace and reports.
- Your tax bills are visible in the Tax Bills and Collections Primary Workspace
Set Your Tax Roll Collection Date
Activating or Freezing your tax roll for the Collections Cycle is performed by selecting setting the Tax Roll Date for your tax period
- Navigate to ‘Tax Roll Setup’ Primary Task.
- Select your tax period for this tax year
- Edit the ‘Tax Unit General Info’, ‘Tax Roll Date’ ; set it to the date you begin to accept tax payments and show the new tax bills on your online property tax search.
After setting your Tax Roll Date you will see your new tax bills in ‘Tax Bills and Collections’ and changes to your tax bills in this tax period will replicated to your Online Property Tax Search.
STEP NINE: Updating Your Pontem Online Property Tax Search Data
If you subscribe to Pontem Online Property Tax Search, after you set your Tax Roll Date you need to publish your fill tax roll with the current rates and dates to your website.
For instructions on how to upload your tax roll for your Online Property Search, click here !
0 Comments