STEP ONE: Configuring ‘System Preferences’
To configure your Pontem Tax Administration application to use the General Ledger Export select ‘Edit | Adjust System Preferences | Import-Export | GL’ in the ‘System Preferences” menu.
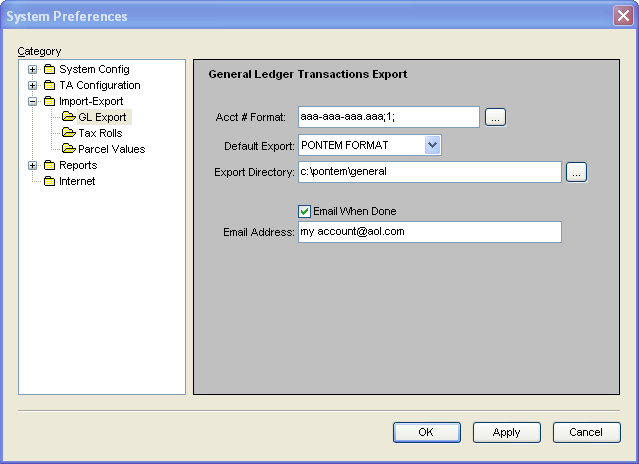
- The Acc # Format should emulate the pattern of the account numbers in the user’s general ledger software. Your Pontem software will add the’ ;1;’ at the end of the pattern.
- The selected Default Export will display when the user is actually performing the export..
- Export Directory: is the path to where the export files will be created.
- Email Address: is used if the user will always want to email the file. The check box and email address are optional fields.
When you have completed the above setup steps, click OK.
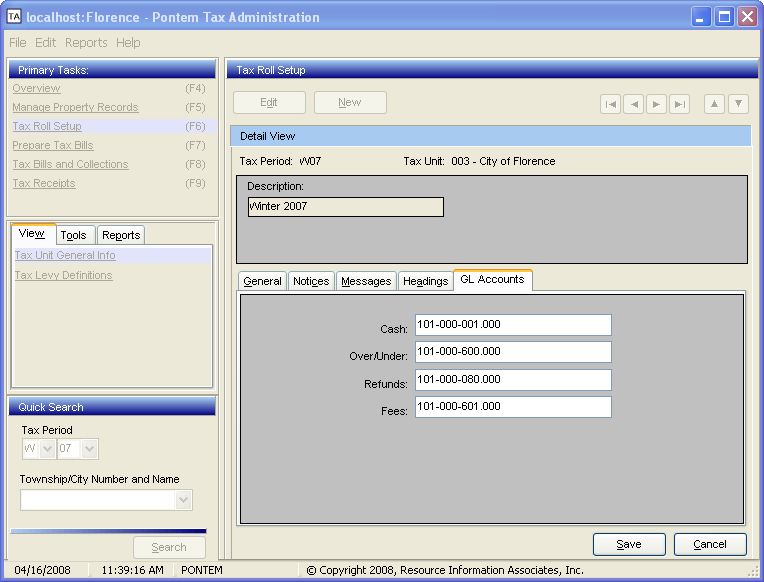
STEP TWO: Configuring the Tax Roll Setup
Select the Primary Task labeled ‘Tax Roll Setup.’
Next, select the ‘Tax Period’ in which the ledger account numbers will be set up starting at ‘Tax Unit General Info.’
STEP THREE: Configuring Tax Levy Definitions
On the ‘View’ tab select the ‘Tax Levy Definitions’ link.
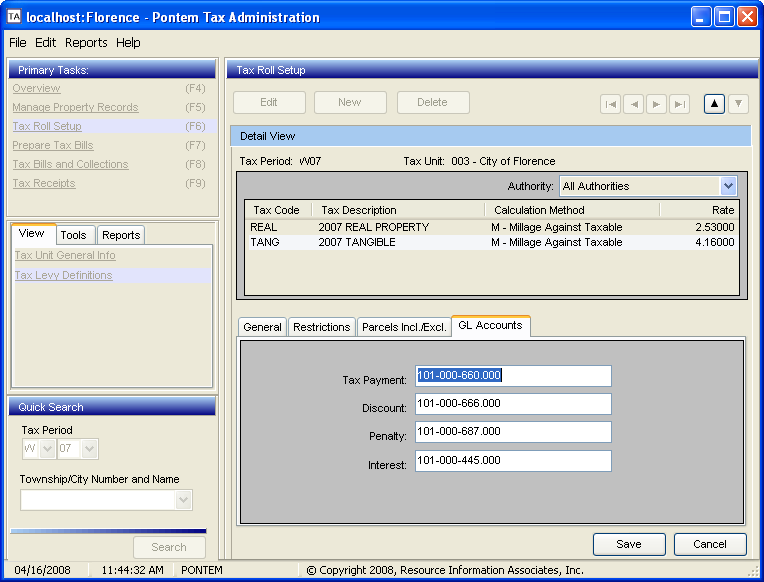
Next, select the ’GL’ tab and click on the ’Edit’ button. Enter the ledger account number for the displayed fields. Click ’Save.’
NOTE: On the ‘Tools’ tab there is a tool labeled ‘Create/Clone Tax Period.’ This tool is used prior to calculating tax bills for a new tax roll, and carries all the data entered to the new tax period for the Tax Levy Definitions and Tax Unit General Info (including the ledger accounts numbers) from the ‘Clone Year.’
Users should review cloned records and update them for the new tax year by electing to ‘Edit the Clone Year’ to change ledger account numbers for delinquent payments if necessary before proceeding.

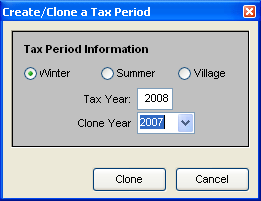
Users should review cloned records and update them for the new tax year by electing to ‘Edit the Clone Year’ to change ledger account numbers for delinquent payments if necessary before proceeding.
STEP FOUR: Preparing to Export Ledger Transactions
After posting payments, to export ledger transactions select ‘File | Export | GL Transactions Export.’
The following screen will now appear:
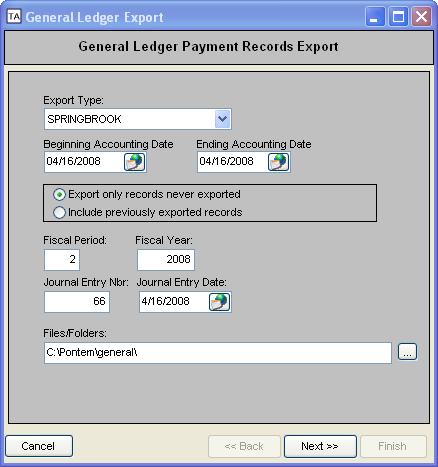
This screen displays the result of the default values (‘Export Type’ and ‘Files/Folders’) that were set in ‘Edit | Adjust System Preferences | Import-Export | GL.’ Enter the appropriate information each field.
NOTE: If you find that you need to export data that has already been exported once, select ‘Include previously exported records.’ Click ‘Next.’
A warning box like the one below will appear advising an export file already exists in the Files/Folders path.
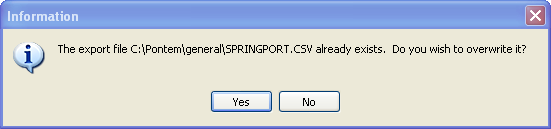
This advisory appears because a previous export file is in the Files/Folders directory. If you wish to overwrite the existing file with a new export click ‘Yes.
STEP FIVE: Reviewing Trial Run Results/Confirm Posting Records
Review the following screen to identify any accounting errors before proceeding with your export. If there are errors that need to be corrected click ‘Cancel’ and make any necessary corrections. Once corrections have been made re-run the export.
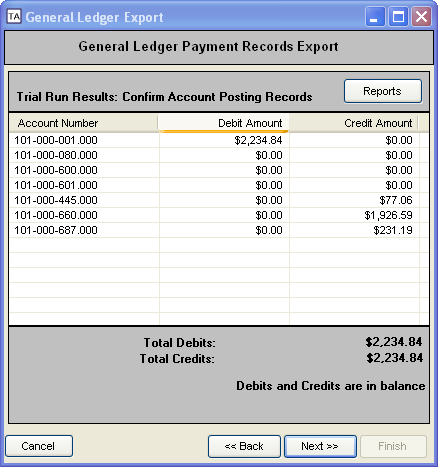
NOTE: The ‘Reports’ button will produce a Distribution Report. This should be considered an audit report for the export. Review the report and if all is in order, click ‘Next’ to create the actual export file.
STEP SIX: Completing the Export
The following screen will now appear:
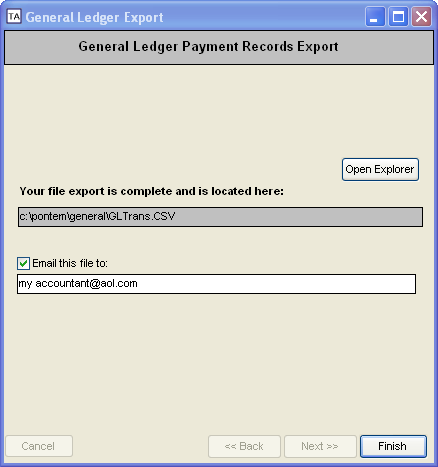
Note the screen indicates where a copy of your export is located. If for some reason you wish to look for the file on your computer click ‘Open Explorer’.
If you do not wish to email a copy of your export uncheck the box labeled ‘Email this file to.’ Likewise, if you wish to revise or change the email address to which your export will be sent make this revision now. When complete, click ’Finish.’
STEP SEVEN: Emailing a Copy of Your Export
If you elected to send a copy of your export via email, an email message screen will
automatically appear with the address of the sender and recipient as well as the subject already completed.
Instructions about how to attach the export file is also automatically displayed in the message portion of the email to guide you through the remaining steps of the process.
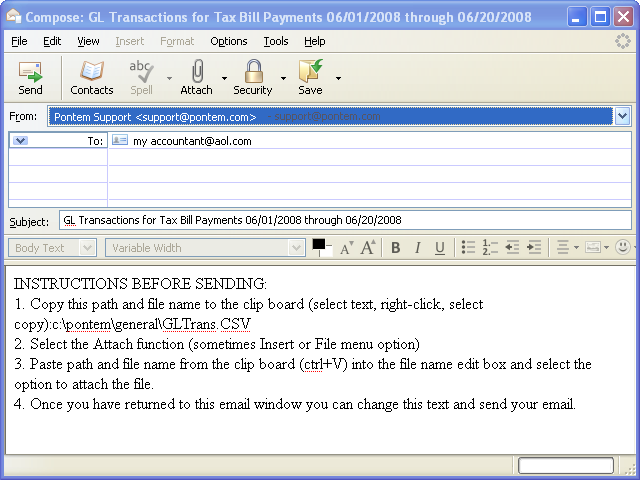
NOTE: Once you have attached a copy of your export file the instructions should be deleted. You can then enter your own message in the body of the email.
Please note if you are using a web-based email client this automated email will not generate.
Once the email has sent, the General Ledger Transaction Export is complete.
0 Comments