INTRODUCTION
Parcel/District District Codes are codes/tags you can assign to a Parcel Record that allow you to flag properties to be billed for specific flat rate Levies, like waste fees or grass cutting. You can also use these flags to allow you to filter reports for specific properties.
For example, by creating a Parcel District Code named "Waste". You can then assign that code to only parcels that should have the Waste Fee included on the tax bill. When you calculate your tax bills, only those parcels that have that "Waste " code assigned on the Parcel Record will have the Waste Fee included on the bills.
Also note, when adding the code to the property, you can assign a Multiplier for properties that are to get charged for multiple units of the flat rate fee.
You can also use Parcel/Special District Codes for assigning to Parcel Records as a means of identifying properties included in a specific city project. Most all of the reports in Pontem’s Tax Administration software can be filtered by Parcel District Code, allowing you to produce a list of parcels specific to an assigned code.
The remainder of this document will explain how to set up and assign Parcel District Codes to Parcel Records in your Pontem Tax Administration Software.
Though this document should be self-explanatory, if you need assistance, don’t hesitate to contact the Pontem Help Desk. See page four for contact details.
STEP ONE: Creating a District Code
Create a District Code by clicking on: Edit | Adjust System Preferences | System Config | District Codes.
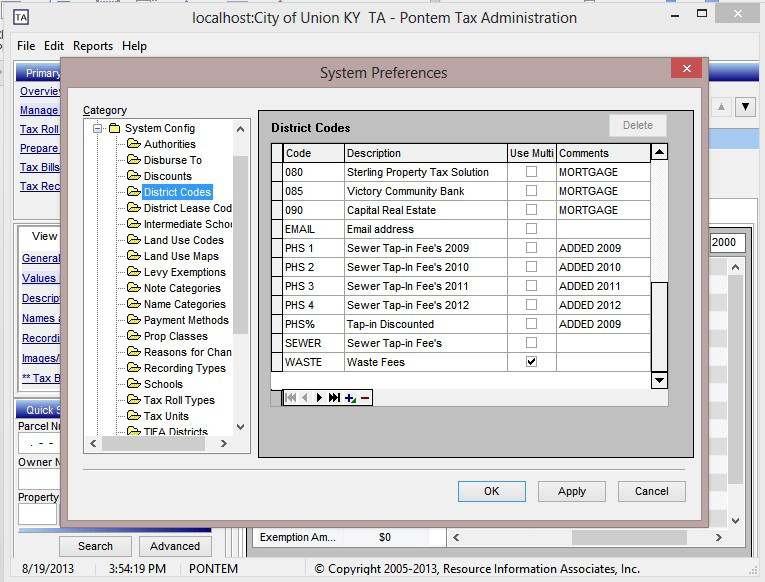
NOTE the "Use Multiplier" column: By default assigning a Parcel District Code to a property record for tax billing will add the fee once on the respective tax bill. However, a Special/District Code may be assigned a Multiplier for those instances when a particular fee can be charged on a property tax bill multiple times.
STEP TWO: Assigning the District Code to a Parcel Record
After the District Code has been created, navigate to ‘Manage Property Records’ to assign the code you created to a Parcel Record.
Select the desired parcel, then click on the ‘General Page’ link on the View Tab to see the parcel details. Notice the codes already assigned are listed in the lower right corner.
Next, click on the ‘Edit General’ button near the top of the window to enter the ‘Parcel General Edit’ screen.
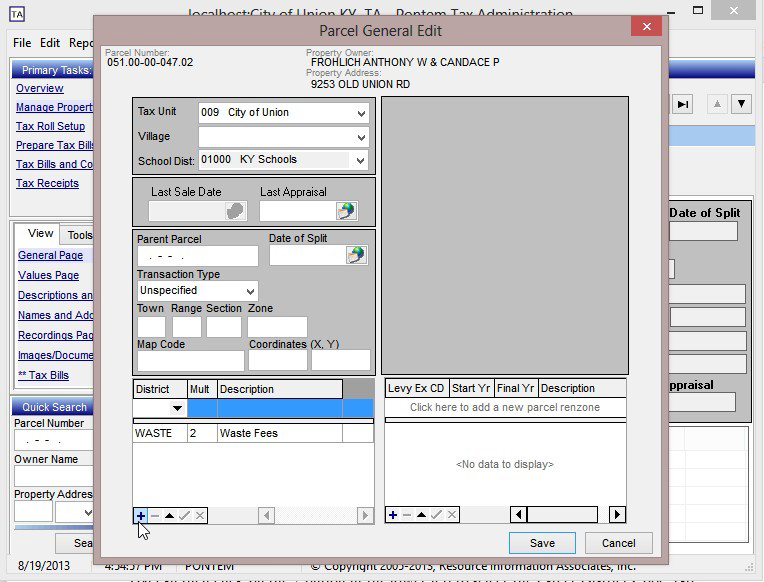
You can then click on the ‘+’ button in the lower left to add a new row. In the first column of the new record/row, select the Parcel District Code using the drop-down list. Tab Key on the keyboard to move over to the Multiplier field and make any necessary adjustments. When finished, click the Save button located in the lower-right.
Other Options for Assigning Parcel District Codes
Pontem’s Tax Administration software also contains a number of tools within the program that allow for assigning (or removing) District Codes in bulk. Please contact Pontem Technical Support for assistance with these procedures.
0 Comments