Your Township Assessor should provide you with a file from their assessing program with the current Principal Residence Exemption status for all the parcels in your township.Imports can be processed directly from a Thumb Drive or CD, you do not need to copy the file to another location. Or you can save the file to your desktop for processing.
- To begin the import click the File menu, then Imports and finally Load Parcel Values.
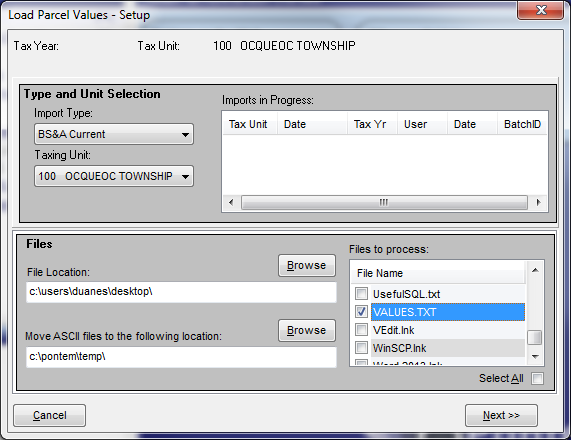
- Complete the fields in the Setup Window
- Select the BS&A Current Import Type (make sure the file has been unzipped)
- Select the Taxing Unit
- Ignore the Imports in Progress
- Use the Browse button to the right of File Location to navigate to the file provided by your Assessor.
- In the Files to process window, look for the file names values.txt check the checkbox next to this file and ignore any other files on the list.
Note: The Assessor works with an Assessment Roll a year ahead of the Tax Roll, so they would provide you with a VALUES.TXT file from their 2018 database for use with your 2017 Tax Rolls. - Ignore the Move Ascii Files… field
- Click Next to progress to the Import Options window.
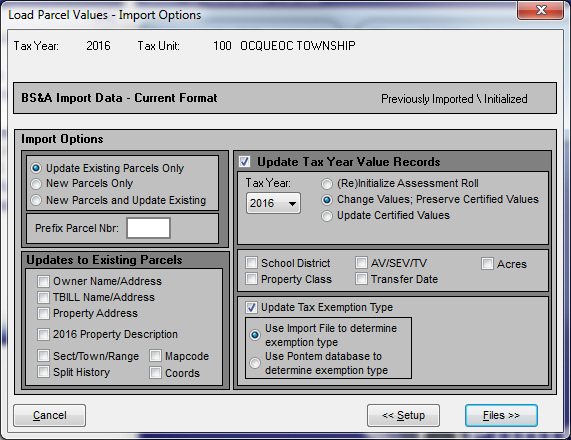
- Complete the Import Options
- Choose Update Existing Parcels Only
- Ignore the prefix parcel number field.
- Leave the Updates to Existing Parcels checkboxes
- Check the Update Tax Year Value Records checkbox
- Select the current tax year.
- Select Change Values; Preserve Certified Values
- Leave the school district and other checkboxes in this area unchecked.
- Check the Update Tax Exemption Type
- Select Use Import File to determine exemption type
- Click ‘Files’ to progress to the File Selection
NOTE: The program will give a warning if the file selected is older than 30 days, if you see this error you may have selected the wrong file for import.
- In the Files Selection window, click the Validate button to proceed with import validation.
- The Parse Results Window shows any warnings or errors found in the import file. For PRE Exemptions it is rare to have errors which would prevent the import from progressing. If there are any warnings, you may want to print them for later reference.
After reviewing the Parse Results, click the Process button to proceed to the Import Values window.
- The Import Values Window will display a list of all the values to be imported. It is the Assessor’s role to assure the data in the file is correct. You should be able to proceed without a detailed review.
- Click the Apply All in List
- Click Continue to confirm.
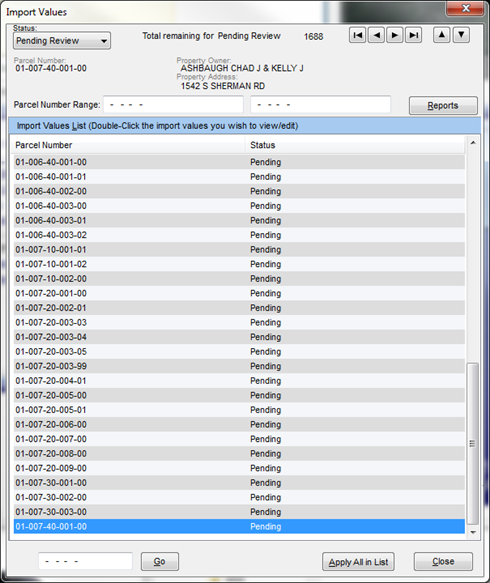
The changes will be applied to your database and confirmations of the import’s success will be displayed.
0 Comments