Before You Begin...
The data required for the import process will come from your Assessor's Current/Calendar Year database (soon after March Board of Review the Assessor begins working on Next years assessments, so be sure that if you are getting ready to calculate 2017 tax bills the Assessor provides data from their 2017 database, not the 2018 database).
BS&A has a standard export that will create the files needed, the files needed from your Assessor's database are...
- VALUES.TXT
- NAMES.TXT
- LEGALS.TXT
All active parcels in the township/city should be included in the export (even though DNR parcels are not part of the summer billing they must be included in this export).
The files from the Assessor should NOT be in a compressed (.zip) format.
You should also receive assessed and taxable value totals from your Assessor to use during the import process to validate your new data.
Save the files from your Assessor to the Desktop (or to 'C:\Pontem\Import'), if the files are already present you should be able to overwrite them.
Importing New Year Assessments...
- When logged in to Pontem Tax Administration, select File | Import | Load Parcel Values.
- Import Setup.
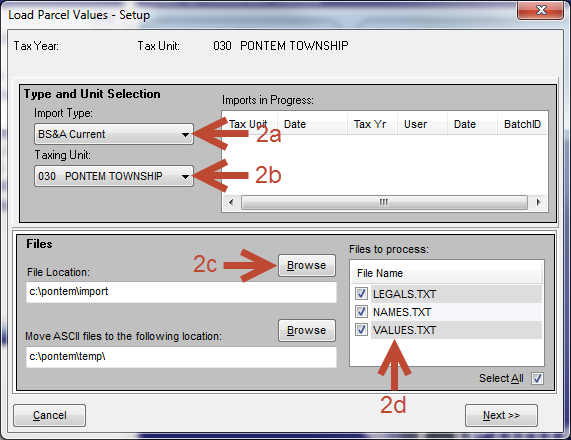
- Select the Import Type (usually BS&A Current).
- Select your Taxing Unit.
- Use the Browse Button above the ‘File Location’ field to navigate to where your import files were saved.
- Select the appropriate files from the 'Files to process' list.
- Click ‘Next’.
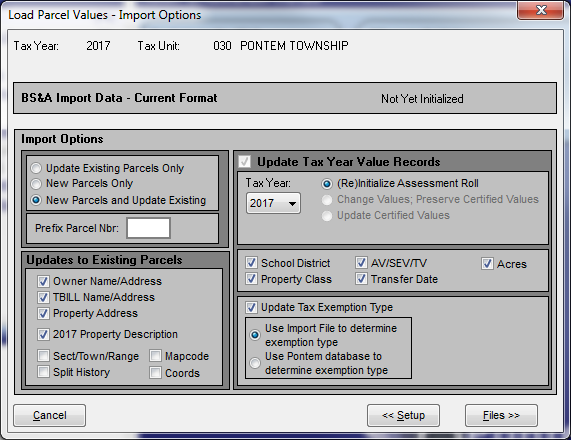
- Import Options.
Note: The selections presented in this section are specifically for importing Certified (March Board of Review) Values for a new tax year. Other procedures related to importing PRE Exemption changes for the tax calculation process may be found in the ‘How to Import PRE Exemptions’ article of the Pontem Online Help Center. - In the ‘Updates to Existing Parcels’ section … select ‘New Parcels and Update Existing’, ‘Owner Name/Address’, ‘TBILL Name/Address’, ‘Property Address’, and ‘2017 Property Description’.
Note: The settings above are presented with the understanding that your Assessor’s data contains the latest Name and Address information for all parcels in your township/city. - Select ‘Update Tax Year Value Records’.
- Select '(Re)Initialize Assessment Roll'.
- Select the appropriate Tax Year (it should default correctly).
- Select ‘School District’, ‘Property Class’, and ‘AV/SEV/TV’.
- Select ‘Update Tax Exemption Type’ and ‘Use Import File to determine exemption type’.
- Click ‘Files’.
- File Selection.
- A single file must be selected for each of the category listed (the files used for the import should be automatically selected as shown in the image below). If the appropriate files are not selected and you are unfamiliar with the correct files please submit an online support request for assistance.
- PRE Source. The bottom right corner of the screen shows the source of the PRE Exemption information being imported.
- File: This shows the database year the file was generated from. For the purposes of this import the year should be the current tax year.
- PRE: This shows if the PRE information is being imported from the current year information in that file or from the Prior year. For the purposes of this import the value should be ‘Current’.

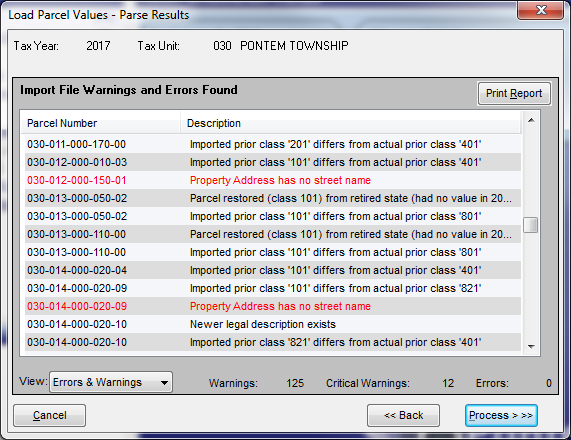
- Parse Results.
- Warnings are informational items that shouldn’t affect the import or calculation process.
- Critical Warnings reflect items that will import OK but might require attention before a tax bill can be calculated or edited.
- Errors MUST be corrected before the data for the parcel involved will be imported. The correction for these could be either manual edits of the records involved or corrections made to the Assessor’s data with a new set of files exported. Errors might come from invalid school districts or property classes.
- If any errors are discovered, print the error report for later reference or support.
- Review.
- Reports – District Statistics Report. Select the District Statistics Report from the report button in the upper right to verify the totals given to you by your Assessor, if the totals do not match your assessor's totals or cannot be verified DO NOT Apply Changes.
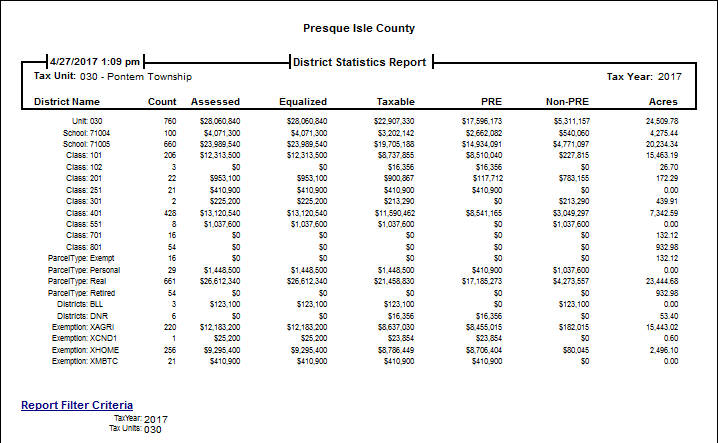
- Side-by-Side Compare. Select a few parcels at random to verify that information is being imported correctly and prevent garbage data from infecting your database.
- Reports – District Statistics Report. Select the District Statistics Report from the report button in the upper right to verify the totals given to you by your Assessor, if the totals do not match your assessor's totals or cannot be verified DO NOT Apply Changes.
- Apply Changes.
Note: Until this step is reached, no data has been applied to your live database, so if there are any problems that must be handled to insure you are importing good information the procedure can be canceled without a problem.- Individual Review. To look at each individual change (not recommended for this import), select a parcel from the pending review list. There are four buttons across the top (General, Values, Names & Legal), changes to a recording are designated when the button label is red. Fields highlighted in yellow show changes from the current information on the parcel. Click ‘Apply’ to accept the change, ‘Edit’ to make adjustments or ‘Reject’ to throw out the changes on this particular parcel. The program will automatically advance to the next parcel with a change when the current parcel is applied or rejected.
- Apply All In List. Click the ‘Apply All in List’ button in the bottom right of the pending review list to post all changes to the database without review. The program will prompt you to continue to confirm your action and then post all.
- Ownership History.
- Select the individual parcel name changes to post as Ownership Changes or click the ‘Select All’ button.
Note: Individual vs. All. Selecting individual sales to identify as changes of ownership will take more time but is more accurate … selecting all is faster and will identify all changes as ownership changes, but this also gives you a history of address changes and other minor adjustments to the ownership of a parcel and that can be advantageous too. - Click ‘Record Ownership History’ button.
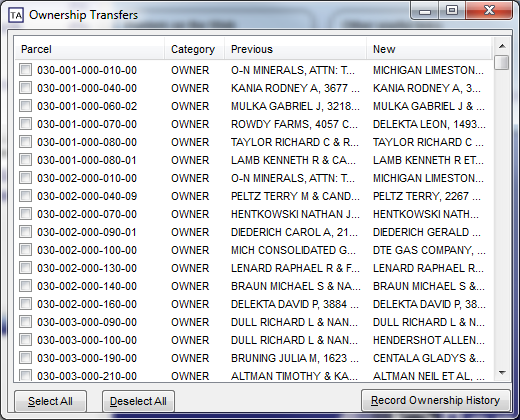
- Select the individual parcel name changes to post as Ownership Changes or click the ‘Select All’ button.
0 Comments